Sponge painting is a delightful craft activity that sparks the imagination and allows children to explore their creativity through colorful artwork. This article will guide you through the exciting world of sponge painting, providing step-by-step instructions for creating unique patterns and designs. With just a few simple materials, kids can dive into a world of artistic expression and create vibrant masterpieces that are sure to bring joy to both the creators and those who admire their work.
Materials Needed:
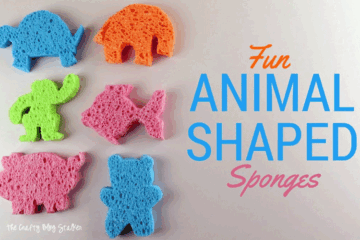
- Sponges (cut into various shapes like circles, hearts, stars, etc.)
- Washable paint in different colors
- Paper or fabric (depending on the desired outcome)
- Palette or shallow containers for holding the paint
- Newspaper or a protective surface to prevent mess
Step-by-Step Guide:
Before starting the sponge painting adventure, it’s important to set up a suitable workspace. Cover the table or surface with newspaper or a protective layer to prevent any accidental paint spills from damaging the area.
Set up the materials:
Gather all the necessary materials and set them up in an organized manner. Pour different colors of washable paint into separate containers or a palette. Ensure that each color has its own sponge or provide a way for children to rinse the sponge between color changes.
Select the shapes:
Let the kids choose their preferred sponge shapes for their artwork. Encourage them to explore various shapes such as circles, hearts, stars, or any other shape that catches their interest. The shapes should be large enough for easy handling.
Dip and stamp:
Instruct the children to dip one side of their chosen sponge shape into the paint of their choice. They should ensure that the sponge is evenly coated with paint but not dripping. Then, they can press the painted side of the sponge onto the paper or fabric, creating a stamped design. They can repeat this step with different shapes, colors, and patterns to build their artwork.
Experiment with colors and layering:
Encourage kids to unleash their creativity by experimenting with different color combinations and layering techniques. They can overlap sponge prints or use different sponges with contrasting colors to create fascinating patterns. This experimentation will add depth and visual interest to their artwork, making each piece unique.
Let it dry:
Once the artwork is complete, allow it to dry completely. The drying time may vary depending on the type of paint used and the surface chosen. Patience is key, as it gives children a chance to eagerly anticipate the unveiling of their colorful creations.
Display and cherish:
Once the artwork is dry, children can proudly display their sponge paintings on walls, bulletin boards, or refrigerators. The vibrant colors and imaginative designs will bring a joyful and artistic touch to any space. If fabric was used, the painted fabric can be transformed into personalized crafts like tote bags, pillowcases, or framed fabric art.
Conclusion:
Sponge painting provides an exciting opportunity for kids to express their creativity and create vibrant artwork. With just a few simple materials, children can dive into a world of imagination, exploring various shapes, colors, and patterns. The step-by-step instructions provided in this article will guide children through the process, allowing them to create unique and visually stunning masterpieces. Sponge painting not only promotes artistic expression but also develops fine motor skills and color recognition.