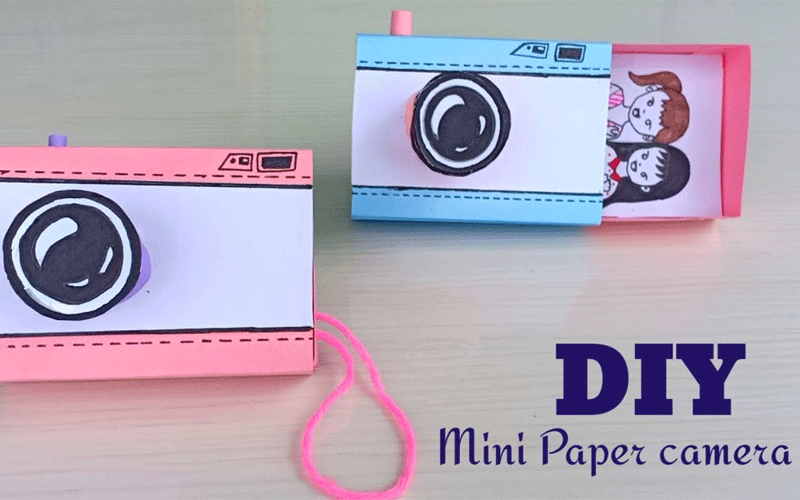
Engaging in arts and crafts activities is a fantastic way to spark creativity and imagination in children. One delightful craft that combines creativity and pretend play is making a paper camera. This do-it-yourself project allows kids to design and construct their very own camera using simple materials. Not only does it provide a fun crafting experience, but it also encourages imaginative play as children embark on pretend photo adventures, capturing imaginary moments through the lens of their handmade camera.
Gather the Materials:
To begin, gather the materials needed for the craft, including cardstock or construction paper in various colors, scissors, glue or double-sided tape, markers or colored pencils, clear plastic sheet or plastic wrap, string or yarn (optional), and decorative stickers or embellishments (optional). Having everything prepared and within reach will make the crafting process smooth and enjoyable.
Cut Out the Camera Pieces:
Start by cutting two identical rectangular pieces from the cardstock or construction paper. These will serve as the front and back of the camera. You can experiment with different sizes, but a good starting point is around 4 inches by 6 inches. Additionally, cut out a smaller rectangular piece from a different color of paper to be used as the viewfinder.
Assemble the Camera:
Attach the viewfinder to the front piece of the camera using glue or tape, positioning it in the upper center area. This will serve as the imaginary lens through which children will “take photos.” Create a circular shape in the center of the viewfinder using black paper or a black marker to represent the camera lens.
Decorate the Camera:
Encourage your child to let their creativity shine by decorating the front and back pieces of the camera using markers, colored pencils, or stickers. They can create patterns, designs, or even write the word “Camera” to personalize their creation. On the back piece, draw a rectangular shape resembling an LCD screen and attach a small piece of clear plastic sheet or plastic wrap to mimic a real camera screen.
Add Optional Features:
For added fun, punch a hole on one side of the camera and thread a piece of string or yarn through it. This will enable children to wear their paper camera around their necks, just like real photographers. Additionally, they can enhance the camera’s appearance with decorative stickers or embellishments.
Assemble the Camera:
Glue or tape the front and back pieces of the camera together, leaving the bottom edge open to create a pocket-like structure. This will allow children to slide in small rectangular pieces of paper to simulate photos.
Imaginative Play and Photo Adventures:
Once the paper camera is complete, children can engage in imaginative play, pretending to capture photos and embark on exciting photo adventures. Encourage them to explore their surroundings, “taking” photos of imaginary moments, landscapes, or even their favorite toys. They can narrate stories about the photos they’ve taken, fostering storytelling skills and imaginative thinking.
This craft not only stimulates creativity but also provides an opportunity for children to develop fine motor skills practice. It fosters their ability to observe and appreciate the world around them, even through imaginative lenses.
Conclusion:
The DIY paper camera craft is a delightful and engaging activity that combines creativity, crafting, and imaginative play. Through the process of designing and constructing their own camera, children develop fine motor skills, unleash their artistic abilities. The camera becomes a tool for capturing imaginary moments, allowing children to embark on photo adventures. This craft encourages children to explore their surroundings, appreciate their environment, and engage in imaginative thinking.